Ok, so I know that I've probably mentioned my bed before, but let me again say: I have the best bed ever. It's a queen sized captain's bed with a bookcase headboard. You can get one from The Bean Bag Store: http://www.thebeanbagstore.com/bhdillonqncaptain.htm. I bought my mattress from Ikea. It's a Sultan Forestad; a foam mattress about 6 inches thick including a layer of memory foam on top. Super comfy :)
This is all old news, of course. The reason I'm posting is my latest update which makes my already spiffy bed the ultimate in comfort and convenience *grin* I just found out about this genius idea called the duvet cover. Basically it's like a giant pillowcase for your comforter. You put your comforter inside, and then you wash the cover every week and only wash the comforter once a year or so. Cool beans. But wait, there's more...
I've always slept with a top sheet, at least one blanket, and a comforter. The problem is that I toss and turn, so I tended to have a problem with my sheet getting tangled up. The solution was to tuck it in at the bottom and all the way up one side. Then the sheet couldn't go anywhere to get tangled. But that did leave me feeling kind of... trapped. Plus my toes got squished.
Enter the European bed setup: You keep your bottom, fitted sheet. But you get rid of your top, flat sheet and you get rid of your blankets. Then you get a comforter or duvet and stuff it into your duvet cover. This means that you only have one cover to keep track of. You have no sheet to get tangled or kicked to the foot of the bed. If you get too hot, you can just stick a limb or two out from under the duvet in any direction :) Also, you can simply flip the whole duvet over and have the cool side towards your skin.
That's fine, you say, if getting too hot were a problem for me. But what about cold sleepers? No, no, I tend to feel cold at night too. They make these things called down comforters. I thought they were an expensive gimmick, but it turns out I was full of it. I just bought one from Overstock.com, and I'm very, very pleased with it :) It is way lighter than my old comforter and blankets, but it is super warm. I turned off my heater and let the house cool to 60˚ last night, and I was totally comfy with only the comforter :) I was warm, but not too warm. I've heard that down comforters tend to be cool in hot weather and warm in cold weather, so I'll have to wait till summer time to test the hot weather part...
Anyhow, when it's time to do laundry, you pull off your fitted sheet, your pillow cases, and your duvet cover. Go ahead and leave it inside out for washing, cause you'll need it that way to put it back on anyhow. After the linens are clean, you get to put the duvet cover back on. How to Put on a Duvet Cover? Check out this great video and this excellent blog post.
If only I'd known about this great combo while I was living in France. I couldn't figure out why the stores didn't have blankets! I didn't want to buy a down comforter, because I thought of them as very fancy... Too bad it took me 10 more years to figure it out!
Friday, December 31, 2010
Tuesday, December 7, 2010
Monterey Bay Aquarium
Every year I fly down to Monterey to attend the Mathematics conference at Asilomar. I have never made it to their world famous aquarium though. Our plane got in so early that I finally got the chance to go to the Monterey Bay Aquarium! We even had a friend who lent us her guest passes (she's a member). I had a lot of fun taking photos -- here are a few of them. The weird seahorses are particularly neat :)


Tuesday, June 22, 2010
Getting Ready for War, aka Problems & Pasties
This afternoon I put together Haley's rope bed and tightened the rope net. I figure this way we'll both have tight beds for West/An Tir War next month. (A tight rope bed = a comfy rope bed. That's where the rhyme "Night, night, sleep tight" comes from!). I also took the opportunity to dump out some straw from both of our mattresses. I really need to be able to fit the mattresses, beds, tent, and tent poles in the trailer. Alas, my mattresses have decided to defy physics. I dumped out a *lot* of straw -- it looks like the straw would fill the trailer on its own. And yet, the stuff *still* doesn't fit!!!

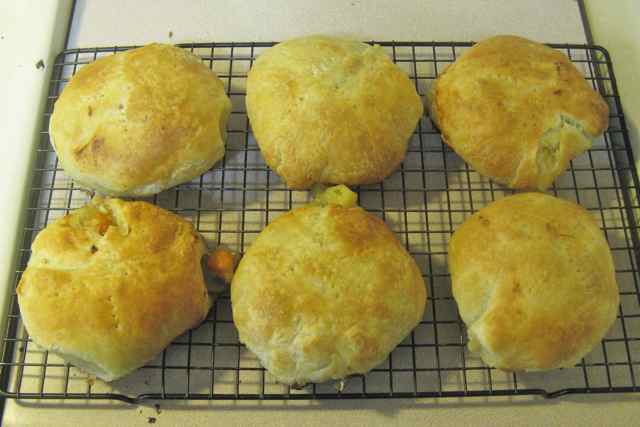
Then I made a batch of pasties from my leftover chicken stew. It was an experiment, because normally I use premade pie crust dough that I roll out. However, this time I tried using puff pastry dough. It's definitely more expensive -- I get 4 pasties per box of dough, while I would get 6 from a package of pie crust. However, it's tons easier. I let the sheets thaw and then cut each sheet into 2 big squares and 2 little rectangles. I kind of squash the big square into my smallest glass bowl, and then dump a ladle of soup on top of it. Then I lay the little rectangle on top of the stew, and tuck in the corners. Next I flip the corners of the big square into the middle, over all of it and kind of pinch things together. Lastly, I flip the bowl over and dump the pastie onto my hand, and then gently nestle it onto a baking sheet. EASY. The trick is to get the dough thawed just right. Too frozen and it breaks when I try to mould it into the bowl. Too warm, and the dough gets stick and sticks to the bowl. Anyhow, it's enough faster & easier that if these are even close to as good as my regular pasties, I'll be making a bunch of them for West/An Tir war :)


Then I made a batch of pasties from my leftover chicken stew. It was an experiment, because normally I use premade pie crust dough that I roll out. However, this time I tried using puff pastry dough. It's definitely more expensive -- I get 4 pasties per box of dough, while I would get 6 from a package of pie crust. However, it's tons easier. I let the sheets thaw and then cut each sheet into 2 big squares and 2 little rectangles. I kind of squash the big square into my smallest glass bowl, and then dump a ladle of soup on top of it. Then I lay the little rectangle on top of the stew, and tuck in the corners. Next I flip the corners of the big square into the middle, over all of it and kind of pinch things together. Lastly, I flip the bowl over and dump the pastie onto my hand, and then gently nestle it onto a baking sheet. EASY. The trick is to get the dough thawed just right. Too frozen and it breaks when I try to mould it into the bowl. Too warm, and the dough gets stick and sticks to the bowl. Anyhow, it's enough faster & easier that if these are even close to as good as my regular pasties, I'll be making a bunch of them for West/An Tir war :)
Monday, June 7, 2010
Even More Fantastic
So I just had to show off my tent, which is EVEN MORE FANTASTIC when I lift one of the sides up :)


Monday, April 19, 2010
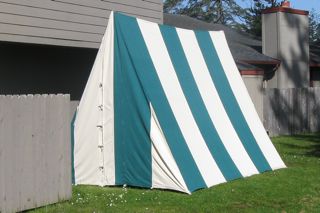
My Fantastic Tent
So Dad came up this weekend and helped me do a bunch of chores. In addition to helping me install a programmable thermostat and fix my garage door opener (luxury is coming home on a miserable, rainy day and being able to park in the garage and walk into a warm house!) he helped me set up my tent for the first time.
I finally figured out how to handle the ridgepole. You see, my tent is like a giant pup tent. Really, really giant. It's 10 feet wide and 10 feet tall and 15 feet long, though it doesn't feel that huge when it's set up. The problem is that I drive a Prius, so 15 foot long pieces of lumber are not exactly going to fit in the car. I bought the world's cutest trailer, but it's rather less than 15 feet long inside, so the problem remains. The problem is how to join wood together so that it is both extremely rigid and easy to disassemble for travel. I used some more 2 inch thick poles (the same as on my beds) as the two uprights -- I just got some round pipe from a local muffler shop to use as a joint. However, the 2 inch poles were too saggy to make a good ridgepole -- I needed to use 2x4, turned on its side. The problem is that you can't get metal sleeves for 2x4 without paying a lot of money. However, you *can* purchase this neat angle iron stuff, that has lots of holes for mounting. So I picked two opposite corners of the 2x4 and screwed this angle iron onto it, making a sheath for the mating 2x4. It worked pretty well, until the first time we set up the tent. You see, it's impossible to believe how tall this tent is before you've set it up. So the first time we tried setting it up under a tree, and broke the joint on a low hanging branch. Damn. Back to the drawing board -- the angle bracket needed to be attached with bolts rather than screws (the screws had torn out and split the wood). But since I didn't want hex heads chafing against the canvas of my tent, we used carriage bolts. They worked great :) I will probably go back and replace the bracket material later -- they had some that was longer on one side so it will probably do a better job of holding my ridgepole steady. Not really an issue until it's windy, and then it's *THE* issue :)
The second time we set up the tent was much better. We hiked around the Seawood campus and found a different site out in the open. This time the setup was much smoother, and I have lots of photos :)
As you can see, I ended up beside a neighbor's apartment. (Which was too bad -- I spent the night in the tent and they woke me up at 1am dismembering a body. Or something completely innocent that just happened to involve a sledgehammer...)

It doesn't look that big until I get a photo of Dad standing in the doorway.

Then I had to get some shots of the interior, including our beds :)


The only problem came when it was time to pack the beds & tent into my trailer.

As you can see, it's a little overfull. I can't just tie the trailer shut, cause I'll make the hinges tear out from the plastic body :( I hope the mattresses on the bottom will settle and everything will fit. I'll probably end up resewing the mattresses (maybe this summer) so they're only 4 inches thick instead of 6 -- after a certain point what's important isn't how much straw is in the mattress, but how tightly packed it is. I think a 4 inch mattress very tightly packed would be more comfortable than a 6 inch thick mattress loosely packed, and it would be easier to manage (the mattresses are *heavy*!).
I finally figured out how to handle the ridgepole. You see, my tent is like a giant pup tent. Really, really giant. It's 10 feet wide and 10 feet tall and 15 feet long, though it doesn't feel that huge when it's set up. The problem is that I drive a Prius, so 15 foot long pieces of lumber are not exactly going to fit in the car. I bought the world's cutest trailer, but it's rather less than 15 feet long inside, so the problem remains. The problem is how to join wood together so that it is both extremely rigid and easy to disassemble for travel. I used some more 2 inch thick poles (the same as on my beds) as the two uprights -- I just got some round pipe from a local muffler shop to use as a joint. However, the 2 inch poles were too saggy to make a good ridgepole -- I needed to use 2x4, turned on its side. The problem is that you can't get metal sleeves for 2x4 without paying a lot of money. However, you *can* purchase this neat angle iron stuff, that has lots of holes for mounting. So I picked two opposite corners of the 2x4 and screwed this angle iron onto it, making a sheath for the mating 2x4. It worked pretty well, until the first time we set up the tent. You see, it's impossible to believe how tall this tent is before you've set it up. So the first time we tried setting it up under a tree, and broke the joint on a low hanging branch. Damn. Back to the drawing board -- the angle bracket needed to be attached with bolts rather than screws (the screws had torn out and split the wood). But since I didn't want hex heads chafing against the canvas of my tent, we used carriage bolts. They worked great :) I will probably go back and replace the bracket material later -- they had some that was longer on one side so it will probably do a better job of holding my ridgepole steady. Not really an issue until it's windy, and then it's *THE* issue :)
The second time we set up the tent was much better. We hiked around the Seawood campus and found a different site out in the open. This time the setup was much smoother, and I have lots of photos :)
As you can see, I ended up beside a neighbor's apartment. (Which was too bad -- I spent the night in the tent and they woke me up at 1am dismembering a body. Or something completely innocent that just happened to involve a sledgehammer...)
It doesn't look that big until I get a photo of Dad standing in the doorway.

Then I had to get some shots of the interior, including our beds :)


The only problem came when it was time to pack the beds & tent into my trailer.

As you can see, it's a little overfull. I can't just tie the trailer shut, cause I'll make the hinges tear out from the plastic body :( I hope the mattresses on the bottom will settle and everything will fit. I'll probably end up resewing the mattresses (maybe this summer) so they're only 4 inches thick instead of 6 -- after a certain point what's important isn't how much straw is in the mattress, but how tightly packed it is. I think a 4 inch mattress very tightly packed would be more comfortable than a 6 inch thick mattress loosely packed, and it would be easier to manage (the mattresses are *heavy*!).
Dan Meyer on Teaching Math
"Can I ask you to please recall a time when you really loved something...a movie, an album, a song or a book and you recommended it whole heartedly to someone you really also really liked and you anticipate the reaction and you waited for it and it came back and the person hated it...so by way of introduction, that is the exact same state in which I spend every working day for the last six years. I teach high school math. I sell a product to a market that doesn't want it, but is forced by law to buy it. It is just a losing proposition." - Dan Meyer
Yeah, that pretty much sums it up. Click on the video to watch the rest of his inspiring talk:
Friday, April 16, 2010
Neat Video on Education
This lady is pretty eloquently describing the state of affairs in American education today, and why we need to change the status quo. I'm glad to hear that Canada is considered a top nation as far as education is concerned -- that reinforces my desire to teach there :)
Sunday, April 11, 2010
Fancy Free
Haley got an invitation to spend the night at a friend's house, so I had a night to myself. I dropped her off a bit before 3, and when I pulled away from the friend's house, I noticed a sign showing that the road continued to Stout Oak Grove. I've been meaning to go hiking there for years, so even though it was threatening rain I turned away from home and headed up the hill. The asphalt petered out, and the road became 1 1/2 lanes of dirt and gravel.
In French, the word for pothole is "nid de poule" or "chicken's nest". I now need to look up the word for ostrich in order to be able to translate the magnitude of these potholes. Wow, they weren't kidding when the sign said "rough road".
It was only 6 miles to Stout Oak Grove, but it took me more than 20 minutes. Maybe even half an hour -- I didn't start looking at the clock until I thought, gee, I've been driving for a *long* time! It was worth the drive, however :) The signs described Stout Oak Grove as the heart of the local state forestland, and it was very pretty. In the summer, there's a bridge across the river from the Jedadiah Smith campground and campers can cross the river to hike. We might spend a couple nights there this summer for the hiking :)
The nice thing about hiking by yourself is the quiet. You get to focus on the sounds of nature, and if you're really desperate for conversation, you can always talk to yourself :) Plus you get to hike as fast (or as slowly) as you like, and nobody announces that they have to go pee *right now*! Yeah, can you tell I've done most of my hiking lately with a kid? I really had a fun time pretending that I was a feckless college student, and not a responsible adult.
Luckily I was almost back to the parking lot when it began to rain. The signs indicated that it would be shorter to keep going to 199 rather than retracing my path. Not only was it shorter, but the road was in better condition in that direction too :) I hit WalMart and CostCo on my way back home, and then topped off my irresponsible behavior by eating ramen and cheetoes for dinner. (I hope Haley doesn't read this post!)
Sunday, March 28, 2010
Straw Mattresses


So the rope beds are very comfy, but only if you have a mattress. Somehow, I don't think I'll be taking the mattresses off of Haley's bed to go camping with. Also it's more than a little pathetic to go to all the trouble of making a medieval bed and then stick a modern mattress on top! So I needed to make medieval mattresses. Of course, there are always feather beds, but that's a bit outside my price range. Instead, I decided on straw mattresses.
I ordered my fabric from PeriodFabric.com. I used their neutral cotton duck cloth which is a very heavy duty 60 inch wide fabric. To make 2 twin sized mattresses, I ordered 11 yards. (Less than $40!) When it arrived, I washed it on hot and dried it on hot, so that I'd be able to wash it later without worrying about it shrinking.
Then I set it aside and worked on my procrastination skills for a week or two. Fast forward to Spring Break. I'd like to go camping this week, but in order to do that I'm going to have to pounce on any break in the rainy weather, which means I'd better get my camping gear ready to go! This morning I looked at the weather forecast, and although it was nice out today, this was going to be the last nice day until Thursday at least. (I might not get to go camping this week). I knew I needed nice weather for this project, so I hooked up my trailer and went over to the feed store to buy some straw. Less that $16 for 2 large (3 string) bales of straw!
I spread about half a bale of straw out on a tarp in the sun, and sprayed it with some essential oils* in rubbing alcohol. I'm hoping the smell will deter any bugs that might otherwise set up housekeeping in my new mattresses. The straw looked clean and smelled nice :) It was sunny and breezy, so I stirred and sprayed periodically while I worked on sewing the mattresses. We laid the fabric out on the ground and cut it outside.
We used a carpenter's chalk line to snap a nice straight cutting line for me to follow. It worked great -- I wish all my sewing projects had straight lines so I could use it all the time :)
My friend recommended that I use upholstery thread. Dang, I could use that stuff as fishing line! My seams are going nowhere! It was a pain to get set up though; the darn thread keep trying to unroll itself from my bobbin as I was winding it!
Once the mattresses were sewn, we started stuffing them with straw. We filled them as full as they would go, picking them up and shaking the straw to the bottom as we went, so that they looked more like beanbags than like mattresses. The straw compressed very quickly though, so that they looked like mattresses again. In fact, I may need to top them off with more straw in a couple of days.
The verdict: A success! I got a prickly straw rash from filling the mattresses, but the straw doesn't poke through once inside. They are very comfortable and the essential oils smell nice :) I'll probably want to fluff the mattress every day or two to even it out, but I'm looking forward to spending the night on my new bed :)
* My recipe was 1 cup of rubbing alcohol to 5 drops each of lavender, citronella, cedarwood, rosemary, eucalyptus, and peppermint, mixed up in a big spray bottle.
I've written up walkthroughs for anyone interested in making their own rope bed or straw mattress.
Friday, March 26, 2010
Rope Beds: Take 2
I decided on a few alterations of my bed plan. The benefit was that I could use (with only slight altertions) the same parts I had already purchased. Since I'm a teacher, I used my connections to get in touch with the high school shop teacher. He agreed to let me come over and work on my bed parts there. It took a while to find a day that worked for both of us, but I finally made it over.
First, I've gotta say WOW. How did I not know about shop class when I was in high school??? So many tools, nice layout, powerful drill press. I should have taken photos but I was busy drilling. Oh yeah. I have a serious crush on that drill press. My friend's drill press stalled out if the bit grabbed too much material, so I was producing a lot of sawdust as I slowly drilled my holes. THIS drill press CHEWED through the wood, producing chunky shavings and drilling deep holes in about 60 seconds!!! Yummy.
Anyhow, my original bed plan had the poles going into my 4x4 legs on the same level. The problem with that is that a 4x4 is really only 3.5x3.5. If you draw a little picture, you'll see that if you're drilling 2 inch wide holes, there's only enough room for the holes to be 1 inch deep (even drilling wide of center). So the poles weren't set very deeply into the legs, which contributed to the wobbliness. Also, since the poles were all on the same plane, that allowed the bed to wiggle a lot. Lastly, I'd overestimated how tall I wanted the beds. The extra height was unnecessary and adding to the problem. My solution: cut off 6 inches from the tops of my leg posts (thus removing my old holes) and redrill holes which vertically offset the head/foot and side poles. That way I could drill much deeper holes without worrying about them running into each other. I decided to lower the head and foot, because in the old design the head and foot ended up much higher than the middle due to sag. I figured this would help counteract that, since there was a limited amount of sag the higher sides would allow. (Important to me since I like to sleep on my tummy and there's a limit to how much my back likes to bend that way!)
So the shop teacher used his chop saw to shorten my 4x4s and I got to drill lots of holes :) You know what? It worked!!! My beds are now much sturdier, and don't have that annoying high head & foot feeling. The legs tend to spay out just a little, which is a good thing as far as stability is concerned, though it does look a little sloppy ;)


I've written up walkthroughs for anyone interested in making their own rope bed or straw mattress.
Monday, March 15, 2010
Rope Beds: Take 1
Today Dad and Andrea came up for a visit, so I got them to help me with the final stages of my rope beds. The beds are made out of 4x4s for the legs and 2 inch thick poles for the head, foot, and sides. All this is held together by a whole bunch of rope woven like a basket or hammock. I'd already drilled the holes in my legs in a friend's garage (Yay for friends who own a drill press! Thanks Thorkil!) but I needed some help with the rope. I had a diagram I'd made to follow for the weaving, but it really looked like a 2 person job.
Last night I dragged Andrea out to the garage and we wove a bed together. The design involves weaving to the head and sides but not to the foot. Instead a thick dowel is laid across the bed about 8 inches above the foot, and the rope weaves to that. Then that dowel is lashed to the foot pole, and that rope can be tightened as the ropes stretch and the bed begins to sag. This genius design is courtesy of Cariadoc, who even has a period drawing that shows a bed designed in such a way!

We stole one of Haley's mattresses off her bunk bed and put it on the rope bed to try it out. Pretty darn comfy! Too bad the bed itself was so wobbly! Haley elected to spend the night in the garage, on the rope bed and slept very well.

In the morning, while Andrea and Haley went shopping, Dad and I went into project mode, and I got him to help me rope the second bed. We did a much better job (outside in the daylight) and the ropes actually ended up meeting back together in the end, which hadn't happened with the other bed. So I talked him into reroping the first bed with me too. They looked fantastic!


Unfortunately, they were wobbly enough that while I thought Haley was probably ok, I didn't feel comfortable sleeping on it -- if I jerked suddenly in a dream the legs might collapse!
I knew I needed to alter my design, but how?
Sunday, February 7, 2010
Prius Trailer
I wanted a Prius for years before I bought one. When I finally bought my Prius two odd years ago, it was very exciting. I'm driving my dream car, which is a great feeling :) However, even back in high school I was talking about buying a trailer to haul my SCA gear to medieval events.
I was visiting my family for Christmas, and driving in town with Andrea. She spied a cute little yellow trailer at Don's Rent All in Eureka. We stopped and asked -- they were selling it for only $1500, which is $500 less than the list price.
So I called the Prius dealership, and they told me that while it wouldn't exactly void my warrantee, if anything went wrong that they could blame on hauling a trailer, they wouldn't pay to fix it. They were so serious about it that a manager called me back the next morning to emphasize the point (which means they know who I am!).
Nonetheless, I did some online feasibility research. There were some really informative websites, and it seemed entirely possible. In fact, some lunatics in the Yahoo Prius group haul boats with their Priuses! So I went back down to Don's to take a second look. I ended up talking to the boss (though I didn't know it at the time) and managed to talk him down to $1300. That's $700 less than list (a hefty 35% discount says the math teacher) -- I couldn't pass it up! So I went ahead and bought it, and they agreed to store it for me for a couple (or so...) weeks until I could install a trailer hitch.
So after a bunch of research, I ordered my parts and Dad and I installed the hitch and the wiring kit. Since wiring kits for the Prius aren't exactly common, I ended up following some online instructions to adapt a Camry wiring harness. After some initial stress (we broke 3 tiny screwdrivers trying to pry with them and still had a heck of a time getting a couple of wires to let go!!!) we finally go the wiring harness rewired for the Prius. After that, the installation of the hitch and wiring harness was pretty routine (a minimum of swearing) and we were able to go pick up the trailer that day. (Note that the time estimates are a crock of poop. We started at about 10am, and finished just after 3. Though, this did include two store trips to replace tiny screwdrivers that we broke prying with them and a missing 10mm socket. Still, longer than the instructions indicated by rather a lot.
After picking up the trailer at Don's, Dad took a few photos of our triumph.


Anyhow, after my triumphant return to Crescent City, I was faced with the sad quandary of where to park my trailer. Unlike a car, you can't secure it by simply locking the doors, so I really needed to store it in my garage. Alas, that meant that I couldn't park my car inside the garage bcause I had too much junk stored in there. And it's been raining here for the last 3 weeks. Insert a whole week of parking outside and running to and from the front door. Ugh.
Well, I bought two more wire shelves, and last night I finished the chore of mucking out my garage. I had a lot of empty cardboard boxes! In fact, I even had three boxes of crumpled newspaper from when I moved my dishes!!! So after ruthlessly pruning out a bunch of junk to give away and a whole car load of cardboard and newspaper recycling, I AM ABLE TO PARK MY TRAILER AND MY CAR IN THE GARAGE AT THE SAME TIME!!!!!!! Did I mention that it's been raining for three weeks?!?! YES!!!

Then this afternoon, I got a call from another Prius owner. Apparently, he'd been looking at the same trailer I had, though I beat him to the punch. He wanted some advice on installing a trailer hitch and wiring harness for a Prius. I thought I'd include my email to him, so that if anyone is searching for similar instructions, they can get them :)
***
Hey there,
The two best explanations I found for installing the trailer hitch and the wiring harness were by the same guy; you can find them at http://www.evnut.com/prius_hitch.htm and http://www.evnut.com/prius_trailer_wiring.htm. I ended up using the parts he used in his project. I purchased them from etrailer.com -- it's a big enough order that shipping was free. You can find them at http://www.etrailer.com/pc-H~11468.htm and http://www.etrailer.com/p-118308.htm.
I can confirm that (so far) the wiring works just fine and hasn't shorted anything out :) Once we finally got all the stupid little wires undone (try to find a non-brittle pry tool), it was really easy to rewire the part. Of course, if you're color-blind, you're going to want to get a friend to help you to make sure that you end up with the right wires in the right places :)
Etrailer.com also made a movie of installing the Curt hitch -- I felt much more confident about the project after watching it. http://www.etrailer.com/tv-hitch-install-2007-toyota-prius.aspx
Etrailer.com does sell other hitches for the Prius -- I'm quite happy with the Curt, but you can examine their selection at http://www.etrailer.com/hitch-2009_Toyota_Prius.htm. They also recommend a different wiring harness. The part they recommend doesn't require rewiring (since it's designed for the Prius) but it does require splicing wires on the Prius, which I wasn't interested in doing. You can look at it at http://www.etrailer.com/pc-VWH~119146KIT.htm?vehicleid=20098041
Here are some more random links: http://www.ehow.com/how_2091017_hitch-toyota-prius-bike-rack.html http://www.marcuse.org/harold/pages/PriusBikeRack077.htm
The tools you'll need are:
socket wrench
10mm socket
14mm socket
"breaker bar" = socket wrench with a really long handle for leverage to undo tight bolts (you can just slide a piece of pipe over a socket wrench's handle)
torque wrench (so you know the bolts tightened the right amount on the hitch)
phillips screwdriver
flathead screwdriver
teeny tiny pry tool (non brittle)
zip ties (to hold down loose wires)
knife (to shorten zip ties)
tin snips or shears to trim plastic underbody panel
and I'm probably forgetting something...
Notes:
There are 4 kinds of fasteners holding the underbody panel on -- two weird compression screws that you pry off with a flathead screwdriver, one big phillips screw, one 10mm bolt, and one weird threaded spike that you have to pull the panel straight down off of (last fastener).
Good Luck!
Sunday, January 10, 2010
Earthquake
I'm at Mom's house this weekend, after flying back from donating stem cells. Today around 4:30 a major earthquake hit. Andrea, Gabby, Haley, Mom and I were all downstairs, and we all jumped into doorways. I was crouching on the floor clinging to the door jamb so I didn't get thrown out of the doorway! It was so sharp and hard, we really thought the the roof might come down or the house might fall off its foundation. (Bear in mind that we're native Californians and have been through *lots* of earthquakes!) Finally it stopped and after the aftershock we were able to assess the damage. The lawer's bookcase in the living room with all the antique books had fallen down and been destroyed. Lots of paintings fell off the walls, and the fridge had come open and lots of condiments fallen out and smashed. The power was out and the gas was leaking so we had to run outside and turn it off at the meter (our neighbor helped).
Although the official magnitude was only 6.5, we were fewer than 30 miles from the epicenter. The general consensus has been that this one was far stronger feeling than any we're had locally in decades (including a 7.2 in 1992). Luckily everybody was ok, and while the house is a mess it doesn't look damaged. Just a block away another Victorian fell off its foundation, so we were pretty fortunate. The power came back on at around 8pm, so we have lights. PG&E came by to check that we'd properly turned off our gas, but they've got so many emergencies that it might be a few days before they can get the gas working. So no heat or stove for now, but at least we can see to clean up :)
Although the official magnitude was only 6.5, we were fewer than 30 miles from the epicenter. The general consensus has been that this one was far stronger feeling than any we're had locally in decades (including a 7.2 in 1992). Luckily everybody was ok, and while the house is a mess it doesn't look damaged. Just a block away another Victorian fell off its foundation, so we were pretty fortunate. The power came back on at around 8pm, so we have lights. PG&E came by to check that we'd properly turned off our gas, but they've got so many emergencies that it might be a few days before they can get the gas working. So no heat or stove for now, but at least we can see to clean up :)
Donating Stem Cells
I had a big adventure lately!
A couple of months ago I got a phone call from a nice lady who asked me if I remembered registering to be bone marrow donor. It turns out that I was a tentative match for a 26 year old woman with Hodgkin's lymphoma; would I be willing to get a blood test so they could see if we were a close enough match? Of course! And thus began my Stem Cell Donation Saga *grin*
First I had to go to the hospital and get some blood drawn. Some was to check if I was a close enough match for the recipient, and some was to check and make sure I didn't have any infectious diseases (cancer patients are already so messed up with the cancer and the meds that getting sick can be the last straw).
Weeks and weeks and weeks later I got a phone call telling me that I was indeed a match. It had been so long I thought we weren't a match and that was the last I was going to hear of it, but I guess not. So then I got reams of paperwork to fill out. It turns out there's an experimental study going on -- instead of jabbing a needle in my hip and sucking out bone marrow (incredibly painful!) they wanted to give me a shot every day for five days and then just draw some blood. Great!
I can't remember the order of all this, but I had a phone interview, I had to get a physical at my doctor's office (since it's too far to travel to one of their sites), and I ended up having to get more blood drawn (since it was too long from the first blood draw until my donation date).
Finally, I had to get shots every day for five days. They were pretty big -- 2mL in each arm :( My RN friend came over to my house to give me the first shot, since it was a Sunday. She also had to draw some blood since they wanted a baseline before giving me the shots. The next two shots I got from my doctor. Then I flew down to SF for my donation, and had the last two days of shots given by the UCSF Medical Center (they were running the study).
Sunday:
The shots hurt, but other than that I was ok. By the end of the day I had a headache.
Monday:
Headache time :( It was weird; normally I get a headache towards the front of my head (you know, like when you have a sinus infection) but this one was at the top/back of my skull :p
Tuesday:
My headache retreated somewhat but my back started to hurt. I've never had a back spasm before, but I'm pretty sure that's what these were. After work I finished recording lessons for my sub to play for my students. Note to self: however long the finished video is going to be, figure you're going to need at least 6 times that much time to edit and encode the video. There is nothing worse than being in a hurry and sitting by your computer for hours while it exports the video to the burning software, and then compresses it for burning. I didn't leave home till 9pm! I took my video to the classroom and popped it into the DVD player, just to make sure everything was ok. And then it didn't work. I contemplated violence, and then popped in the 2nd disc that I'd burned on a just-in-case whim. Whew -- it worked!!! So then I drove down to Eureka.
Wednesday:
Andrea drove my friend Rio and me to the airport. My head and back both hurt, and I was definitely low on energy (though staying up until midnight the last couple of nights wasn't helping!) We flew down to San Francisco and were picked up at the airport by a limo driver. Alas, he wasn't driving a limo when he picked us up *grin*. He dropped us off at the UCSF medical center, where they gave me my 4th set of shots and took more vitals. Then we were escorted across the street to the Acute Dialysis center. They had about five beds in a row, and then a little glass room in the corner -- my semi-private suite for the next day's procedure. There the nurses examined my veins, and concluded that they probably wouldn't need to install a shunt into my neck (ack!) Then they sent us on our merry and told us to be back by 6:30 the next morning. We wandered around a little bit -- our hotel was right on Fisherman's Wharf, so we checked out the cannery and Ghirardelli Square. Rio and I really liked the fountain :)


I didn't have much appetite for dinner that night, so we just ate in the hotel restaurant. It was a pretty hard night for me -- my hips had joined the pain party and I wasn't allowed to take ibuprofen or asprin. Tylenol didn't cut it -- I wished I'd taken the nurses up on the Vicoden they'd mentioned.
Thursday:
The big day! We got up *early* in order to have breakfast and get to the UCSF medical center by 6:30. I felt a little better (I'm always sickest & whiniest at night). I finally got to meet Susan, my official National Marrow Donor Program liaison.

I got my last set of shots and was given a pill to put under my tongue.


Then they sent me to the bathroom for one last pee. (Side note: while you're hooked up to the machine, you can't just get up and pee. So if you've "gotta go", you get to use a bedpan. Avoiding that was a big goal for me, but dehydration is a big no-no. So I drank two liters of water the day before, and then very little that day...)
Then the nurse stuck a needle inside one elbow, and a flexible tubey needle (catheter) in the other wrist.

Thank goodness my veins were up to snuff -- they had me scheduled at 8 to install a neck shunt if they couldn't get the blood flowing well enough without!

The tubes were hooked up to this very steam-punk machine that had spinny, clicky things. The blood came out from my elbow vein, got mixed with an anticoagulant and some other stuff, and then got spun around in a drum inside the machine.

The red cells were heavy and the plasma was light, and in between were the white cells and the stem cells, which they collected.

Then they returned the red cells and plasma to the catheter in my wrist. The hard work was all done -- I'd filled out my paperwork, gotten all my shots, showed up at the right place at the right time... Now all there was to do was relax. The pill they had me stick under my tongue kicked in and I mostly napped for the 5 hours it took to cycle 22 liters of blood through the machine.

At the end of the procedure, they had given all the blood back except for this little bag of stem cells (a few red blood cells get in there too, which is what causes the salmon color). They carefully packaged it up, and a courier collected it to deliver to my recipient. This is less than I give when I donate blood :)

After the procedure I felt fine (still headachey and my bones ached, but I didn't have any additional weirdness from the procedure). A doctor interviewed me and I was released from the hospital. On the way back to the hotel (actually, it was a cross-city detour, but whatever!) we asked the cabby to stop by Yoppi, a frozen yogurt shop :) Then we went back to the hotel and I crashed for a few hours.
That evening I was feeling well enough to ride a cable car to Union Square, where we had sushi :) We also stopped by a pub so I could have a half-pint of draft cider :)

We got all of our tourist goals accomplished in addition to the actual purpose of our trip, so it was a very successful journey :)
It's Saturday now and my back and hips are a little achy and I'm a little tired, but otherwise I feel fine. So just a couple of days later I'm almost fully recovered :)
My overall opinion: It was a big fat pain in the butt, with all of the paperwork and medicine and feeling like I had the flu for a week. It was also incredibly awesome -- I got an all-expenses-paid trip to San Francisco, not to mention the opportunity to help save somebody's life. The chances of being a match are very rare, so I may never come up on the list again, but if I did I would agree in a heartbeat :)
A couple of months ago I got a phone call from a nice lady who asked me if I remembered registering to be bone marrow donor. It turns out that I was a tentative match for a 26 year old woman with Hodgkin's lymphoma; would I be willing to get a blood test so they could see if we were a close enough match? Of course! And thus began my Stem Cell Donation Saga *grin*
First I had to go to the hospital and get some blood drawn. Some was to check if I was a close enough match for the recipient, and some was to check and make sure I didn't have any infectious diseases (cancer patients are already so messed up with the cancer and the meds that getting sick can be the last straw).
Weeks and weeks and weeks later I got a phone call telling me that I was indeed a match. It had been so long I thought we weren't a match and that was the last I was going to hear of it, but I guess not. So then I got reams of paperwork to fill out. It turns out there's an experimental study going on -- instead of jabbing a needle in my hip and sucking out bone marrow (incredibly painful!) they wanted to give me a shot every day for five days and then just draw some blood. Great!
I can't remember the order of all this, but I had a phone interview, I had to get a physical at my doctor's office (since it's too far to travel to one of their sites), and I ended up having to get more blood drawn (since it was too long from the first blood draw until my donation date).
Finally, I had to get shots every day for five days. They were pretty big -- 2mL in each arm :( My RN friend came over to my house to give me the first shot, since it was a Sunday. She also had to draw some blood since they wanted a baseline before giving me the shots. The next two shots I got from my doctor. Then I flew down to SF for my donation, and had the last two days of shots given by the UCSF Medical Center (they were running the study).
Sunday:
The shots hurt, but other than that I was ok. By the end of the day I had a headache.
Monday:
Headache time :( It was weird; normally I get a headache towards the front of my head (you know, like when you have a sinus infection) but this one was at the top/back of my skull :p
Tuesday:
My headache retreated somewhat but my back started to hurt. I've never had a back spasm before, but I'm pretty sure that's what these were. After work I finished recording lessons for my sub to play for my students. Note to self: however long the finished video is going to be, figure you're going to need at least 6 times that much time to edit and encode the video. There is nothing worse than being in a hurry and sitting by your computer for hours while it exports the video to the burning software, and then compresses it for burning. I didn't leave home till 9pm! I took my video to the classroom and popped it into the DVD player, just to make sure everything was ok. And then it didn't work. I contemplated violence, and then popped in the 2nd disc that I'd burned on a just-in-case whim. Whew -- it worked!!! So then I drove down to Eureka.
Wednesday:
Andrea drove my friend Rio and me to the airport. My head and back both hurt, and I was definitely low on energy (though staying up until midnight the last couple of nights wasn't helping!) We flew down to San Francisco and were picked up at the airport by a limo driver. Alas, he wasn't driving a limo when he picked us up *grin*. He dropped us off at the UCSF medical center, where they gave me my 4th set of shots and took more vitals. Then we were escorted across the street to the Acute Dialysis center. They had about five beds in a row, and then a little glass room in the corner -- my semi-private suite for the next day's procedure. There the nurses examined my veins, and concluded that they probably wouldn't need to install a shunt into my neck (ack!) Then they sent us on our merry and told us to be back by 6:30 the next morning. We wandered around a little bit -- our hotel was right on Fisherman's Wharf, so we checked out the cannery and Ghirardelli Square. Rio and I really liked the fountain :)


I didn't have much appetite for dinner that night, so we just ate in the hotel restaurant. It was a pretty hard night for me -- my hips had joined the pain party and I wasn't allowed to take ibuprofen or asprin. Tylenol didn't cut it -- I wished I'd taken the nurses up on the Vicoden they'd mentioned.
Thursday:
The big day! We got up *early* in order to have breakfast and get to the UCSF medical center by 6:30. I felt a little better (I'm always sickest & whiniest at night). I finally got to meet Susan, my official National Marrow Donor Program liaison.

I got my last set of shots and was given a pill to put under my tongue.

Then they sent me to the bathroom for one last pee. (Side note: while you're hooked up to the machine, you can't just get up and pee. So if you've "gotta go", you get to use a bedpan. Avoiding that was a big goal for me, but dehydration is a big no-no. So I drank two liters of water the day before, and then very little that day...)
Then the nurse stuck a needle inside one elbow, and a flexible tubey needle (catheter) in the other wrist.

Thank goodness my veins were up to snuff -- they had me scheduled at 8 to install a neck shunt if they couldn't get the blood flowing well enough without!

The tubes were hooked up to this very steam-punk machine that had spinny, clicky things. The blood came out from my elbow vein, got mixed with an anticoagulant and some other stuff, and then got spun around in a drum inside the machine.

The red cells were heavy and the plasma was light, and in between were the white cells and the stem cells, which they collected.

Then they returned the red cells and plasma to the catheter in my wrist. The hard work was all done -- I'd filled out my paperwork, gotten all my shots, showed up at the right place at the right time... Now all there was to do was relax. The pill they had me stick under my tongue kicked in and I mostly napped for the 5 hours it took to cycle 22 liters of blood through the machine.

At the end of the procedure, they had given all the blood back except for this little bag of stem cells (a few red blood cells get in there too, which is what causes the salmon color). They carefully packaged it up, and a courier collected it to deliver to my recipient. This is less than I give when I donate blood :)

After the procedure I felt fine (still headachey and my bones ached, but I didn't have any additional weirdness from the procedure). A doctor interviewed me and I was released from the hospital. On the way back to the hotel (actually, it was a cross-city detour, but whatever!) we asked the cabby to stop by Yoppi, a frozen yogurt shop :) Then we went back to the hotel and I crashed for a few hours.
That evening I was feeling well enough to ride a cable car to Union Square, where we had sushi :) We also stopped by a pub so I could have a half-pint of draft cider :)

We got all of our tourist goals accomplished in addition to the actual purpose of our trip, so it was a very successful journey :)
It's Saturday now and my back and hips are a little achy and I'm a little tired, but otherwise I feel fine. So just a couple of days later I'm almost fully recovered :)
My overall opinion: It was a big fat pain in the butt, with all of the paperwork and medicine and feeling like I had the flu for a week. It was also incredibly awesome -- I got an all-expenses-paid trip to San Francisco, not to mention the opportunity to help save somebody's life. The chances of being a match are very rare, so I may never come up on the list again, but if I did I would agree in a heartbeat :)
Subscribe to:
Posts (Atom)